Author Topic: Show us your photography setup!  (Read 20600 times)

Offline Harry Caul

  • Curator
  • *****
  • Posts: 5885
    • Marquee Poster
Show us your photography setup!
« on: August 14, 2011, 08:47:59 PM »
I was recently inspired by Ed's fantastic new poster site (www.filmonpaper.com) and I decided to start properly documenting my collection.  I wanted the photos to both be both displayable for a future website (although nothing as fancy as Ed's) and to be useable in case of future sale.

For a photo setup, I first looked to eMovieposters' behind the scenes photo.  I'm an amateur photog so I already have a usable camera and eye-fi card to wirelessly send the pics to my computer.  However, I'm more of a street photographer and I don't even own a single flash.  If I were to buy all the flashes, tripods, beauty dishes, wireless triggers, etc... that eMovie employs I would probably be out $750-$1000.  I'm much too cheap for that and I would rather spend that money on posters, so I set about trying to replicate their setup as cheaply as possible.  I also wanted something that would take up very little space when not in use. 

So I channeled my inner MacGyver and was off to Lowes... 

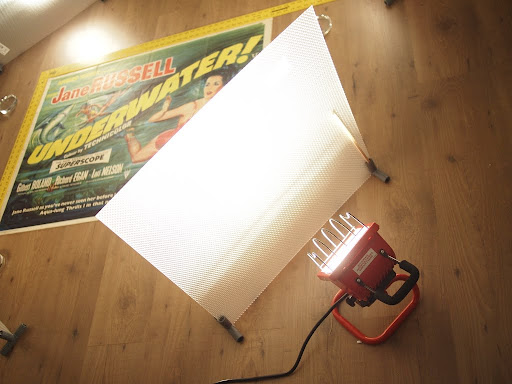
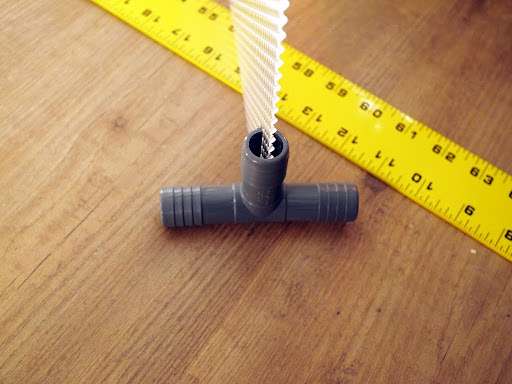
I decided on Halogen lamps pretty early as they were so cheap (although the bulbs aren't as I later found out).  For diffusers, I came up with a couple potential options but ended up with some cheap drop ceiling panels for diffusing fluorescent tube lights.  To get them to stand up vertically (I couldn't do a wall setup like Bruce), I ruled out clamps and stands and other such things as they were too expensive.  I ended up in plumbing, thinking I would build some sort of PVC frame, but eventually thought I might get by with a couple T-pipes that I manually cut along one side.  I also bought some big metal work rulers to frame the poster and document the dimensions.

4 250 watt halogen work lamps $15/each
4 Drop ceiling light diffusers $5/each
8 Plumbing T-pipes $1/each
2 Power strips $8/each
2 6' metal rulers $10/each

When I got home I used my reciprocating saw to cut a slit up the vertical portion of the T-pipes.  Being plastic they had a tendency to retract and close the slit I just made... so they kind of just clamped right on to the light panel.  Sweet.  First problem, though... they were still a little wobbly/top-heavy and would fall over way too easily. I was certain I would have to go back and build something bigger/stronger, but after reminding myself of the KISS principle (keep it simple stupid), I just jammed some thin wood strips on the front and back of the panel one side (they slid right into the pipe).  I had proper sized wood handy, but if you don't I bet chopsticks would be the perfect size (and probably free).  So...

Lights - check
Diffusers - check
Two power strips to easily trigger work lights - check

All systems go... and it worked!  But I blew my first bulb after about 30 minutes.  Shit.  Back to Lowes the next day, only to find out replacements are $5/each.  I bought 2 just in case.  Over the next two days I lost 2 more bulbs.  Hmmm... Before investing in more Lowe's bulbs, I looked online and found that A) it is not that uncommon, B) that I should use gloves when seating the bulbs so as not to get oils on the bulb, and C) replacements can be found MUCH cheaper online.  In fact, I found lower wattage (150w) for only $1/each from 1000bulbs.com.  It was a flat $10 shipping, so I bought 10 just in case.  I wasn't worried about the wattage as the 4-250 watt lamps were already mega bright and it was getting damn hot in my work room!

From then on I'm happy to report that I've had smooth sailing!  To total it all up, with the initial Lowe's trip, the 2 extra bulbs ($10), and then 10 extras online ($20), my setup was grand total of about $150.  Not too bad if I say so myself.  I still only shoot handheld as I would need a tripod, extension arm and wired trigger to do otherwise. But the lights are SO bright that I can use a fast shutter and not worry too much about hand shake -- and my camera is small (Olympus E-P2) so I can keep it steady even with arms extended.  All in all I'm quite happy!

Here are some pics of my new setup and a purty Jane Russell to show off my work!


Offline jayn_j

  • Hoarder
  • ****
  • Posts: 2599
Re: Show us your photography setup!
« Reply #1 on: August 14, 2011, 08:50:34 PM »
Fantastic.  Thanks.  I intend to steal that lighting setup idea.
-Jay-

Offline Harry Caul

  • Curator
  • *****
  • Posts: 5885
    • Marquee Poster
Re: Show us your photography setup!
« Reply #2 on: August 14, 2011, 08:56:33 PM »
Fantastic.  Thanks.  I intend to steal that lighting setup idea.

Please do, that's why I posted it!

Offline Zorba

  • Curator
  • *****
  • Posts: 6024
  • Lets dance!
Re: Show us your photography setup!
« Reply #3 on: August 14, 2011, 08:56:43 PM »
Fantastic.  Thanks.  I intend to steal that lighting setup idea.

Wow. That is pretty cool. Nice job.

I just point click and hope for the best...I also try get the posters from emovie so they will send the pic  :P

I have a feeling a few will be stealing from your set up.

Offline CSM

  • Post-aholic
  • **********
  • Posts: 12567
Re: Show us your photography setup!
« Reply #4 on: August 14, 2011, 10:42:43 PM »
Now that's dedication to one's hobby (or obsession if you like ;) )
Chris

raulleaf

  • Guest
Re: Show us your photography setup!
« Reply #5 on: August 14, 2011, 11:42:38 PM »
Harry, that is very innovative...  Like the makshift light filters.. Good job.  I need to put some measurement tape on my board.

Here is mine.  I had found a pic of Bruce's setup and copied it vertically.  It is actually the top of my map file clamped onto a steel shelving unit on top of an old desk.  All temporary; I keep telling my wife. Bought the two static lamps at Ritz for like $120 and have two more I shoot up from the bottom when I was shooting all my stuff.  Also placed white foam board on top and then on the table. I've been wanting to incorporate the measurement tape.  What is essential is the rare earth magnets. 

As far as the measurements, I think they sell an adhesive backed version..  The professional lighting was because it is very hard to shoot the glossy and matte uber-modern posters without glare.  I still have glare...

I am in a bit of metal transition as I have bought paint that magnets can work on and plan to experiment with it on 1/4" ply-board.  Wanted to make one large enough to accommodate a French Large...


Offline Zorba

  • Curator
  • *****
  • Posts: 6024
  • Lets dance!
Re: Show us your photography setup!
« Reply #6 on: August 15, 2011, 09:12:25 AM »
Very cool Charlie.  thumbup


Offline paul waines

  • Curator
  • *****
  • Posts: 9038
Re: Show us your photography setup!
« Reply #7 on: August 15, 2011, 12:14:37 PM »
Great set-up Matt, how did you suspend your camera over the poster? any pics of that...
It's more than a Hobby...

Offline Harry Caul

  • Curator
  • *****
  • Posts: 5885
    • Marquee Poster
Re: Show us your photography setup!
« Reply #8 on: August 15, 2011, 02:12:34 PM »
I still only shoot handheld as I would need a tripod, extension arm and wired trigger to do otherwise. But the lights are SO bright that I can use a fast shutter and not worry too much about hand shake -- and my camera is small (Olympus E-P2) so I can keep it steady even with arms extended.

Admittedly a tripod with extension arm would be better, but it would also make it more difficult to capture close up details of various portions of the artwork (a la Ed). Handheld isn't ideal, but it works and is flexible (and did I mention cheap?).
 
;D

Offline Harry Caul

  • Curator
  • *****
  • Posts: 5885
    • Marquee Poster
Re: Show us your photography setup!
« Reply #9 on: August 15, 2011, 02:19:18 PM »
Great setup Charlie!  I only wish I had the space for the 'giant metal wall' approach. My poster/disaster room is in a finished attic with (significantly) sloped walls. I was thinking of getting a big metal sheet and hinging it to the wall along the top edge (then unlatch the bottom and let it dangle when in use), but it would probably look terrible when not in use, not to mention the KISS issues.

Offline brude

  • Post-aholic
  • **********
  • Posts: 13565
Re: Show us your photography setup!
« Reply #10 on: August 15, 2011, 05:27:48 PM »
Matt, those are impressive results.
Same for you, Charlie.
I find it very inspiring to see the lengths collectors go to for complete documentation of their paper.
My frequent use of stock pics makes me feel like a real slacker.
My hat is off to both of you.
 clap

Online eatbrie

  • Administrator
  • Post-aholic
  • *****
  • Posts: 12320
    • My Posters
Re: Show us your photography setup!
« Reply #11 on: August 15, 2011, 08:48:54 PM »
I put a 12 foot ladder on my deck and I take pictures of my posters with my Iphone.  Since I only use the pictures for my website, I don't care about quality.  I just want to see the posters.

T
My Personal Collection


- I wish to thank all APF members for being part of the World's Largest Social Gathering of Movie Poster Collectors
- "Wishing you the best of luck with All Poster Forum and in encouraging others to appreciate the magical art of film posters" - Martin Scorsese (2009)

Offline Harry Caul

  • Curator
  • *****
  • Posts: 5885
    • Marquee Poster
Re: Show us your photography setup!
« Reply #12 on: August 15, 2011, 11:11:18 PM »
I put a 12 foot ladder on my deck and I take pictures of my posters with my Iphone.  Since I only use the pictures for my website, I don't care about quality.  I just want to see the posters.

T

Then how is it that every picture on your website is like 85MB?!?  ;D

Repto

  • Guest
Re: Show us your photography setup!
« Reply #13 on: September 22, 2011, 01:37:53 PM »
Excellent, I am so glad to find this thread. I need to do something new, the method I have now is not going to work for much longer. Right now I don’t photograph the posters, I scan them.

I evolved to this from first just trying to use my point and shoot camera which just didn’t work well. I didn’t have any lighting, the flash left glare, the fold lines stood out, the rectangle had a waste and taking pictures of posters on the floor frequently captured my toes.


I had thought the HP 4600 scanner was the answer to my problem. It seemed made for scanning large items on a flat surface then using software to stitch each image back together. It kind of worked but the HP Scanner was such poor quality that every image had stripes of alternating color hues.


I now have a flat bed scanner that I just take the lid off of and turn upside down. So the poster lies on a flat table and the scanner is placed glass side down on top of the poster. The table is marked out along the edges to position the scanner for 6 columns by 3 rows for a 30x40 quad. I then use Panavue ImageAssembler to put each individual 8x10 300 dpi image all together again.

I used to really like this method. It took a while, what with the scanning and the stitching, but you had a completely flat very high resolution image at the end of it. You didn’t have to worry about lighting, lens distortion or focus and the weight of the scanner kept the folds down. The only problem is that the scanner isn’t designed to be used upside down and it’s started making some really worrying graunchy noises recently. I thought I could just buy another of the same model and start again, but the new one I bought won’t scan upside down at all, it moves a little then sticks. Even though it’s an identical make and model I must have just been lucky it worked at all. Googling “scanners that work upside down” hasn’t revealed a solution.

I suspect I have a limited number of scans ahead of me now, that scanner is pretty old. So I am really appreciating some tips on how others do the photographic method. Harry’s setup looks great, simple items I can clear away after using them, always helps in my house…

Online Tob

  • Administrator
  • Hoarder
  • *****
  • Posts: 1969
Re: Show us your photography setup!
« Reply #14 on: September 22, 2011, 05:39:44 PM »
This is a cool thread - very impressive set ups.

My parents live in a house with a staircase that goes up and around, so when I go back to visit them, I make my poor wife (who's currently pregnant!) move the posters about on the floor whilst I lean over and photo them from above.

I have a decent camera, but the lighting is awful so the photos don't always come out so well, especially if they're glossy or black. I'd love some decent lighting, but I don't have the space at my place and don't want to impose on my folks too much. Also, I'm not always directly on top of them leaning over, so there's some distortion and they don't look straight when I crop them. But it'll do for now!

Here's a piccy...

« Last Edit: September 22, 2011, 05:40:33 PM by Tob »

the chip guy

  • Guest
Re: Show us your photography setup!
« Reply #15 on: October 10, 2011, 07:10:23 PM »
I'm glad I found this thread too! Harry and Charlie inspired me to make this little setup...


Only took about an hour and two cases of beer for my brother in-law (he's a welder) to get it done.

only thing left to do is get a new camera..... anyone have a brand, make or model that they can recommend?

Offline lynaron

  • Collector
  • ***
  • Posts: 618
Re: Show us your photography setup!
« Reply #16 on: October 11, 2011, 05:15:07 PM »
I really like my Canon Rebel t3i.  Currently using the standard short zoom (18-55) and am very happy with the results.  I'm still doing the "on the floor" bit with the usual issues of parallax. We just moved to a new place with more room, so a HarryCharlie set up might just be in the picture ;)

Lynn
I'll raise a glass to the illusion but drink to the reality.

Charlie

  • Guest
Re: Show us your photography setup!
« Reply #17 on: October 12, 2011, 03:15:47 PM »
I'm glad I found this thread too! Harry and Charlie inspired me to make this little setup...


Only took about an hour and two cases of beer for my brother in-law (he's a welder) to get it done.

only thing left to do is get a new camera..... anyone have a brand, make or model that they can recommend?


Think he'll make me one for two case of beer.  Sweet deal! 

the chip guy

  • Guest
Re: Show us your photography setup!
« Reply #18 on: October 12, 2011, 06:10:15 PM »
Think he'll make me one for two case of beer.  Sweet deal! 

If you want one sized for quads it might cost three cases of beer ;) It might be a long drive to MN for you though....

Charlie

  • Guest
Re: Show us your photography setup!
« Reply #19 on: October 14, 2011, 07:51:02 AM »
If you want one sized for quads it might cost three cases of beer ;) It might be a long drive to MN for you though....

OK four cases of beer and a tank full of gas???   ;)  Sweet setup.  I took my board down a week and a half ago and I already have a stack of posters that need pics.  Gonna try to put my new board together this weekend...  It should be able to accommodate a Large French....  Stay Tuned!

Offline wormie

  • Hobbyist
  • **
  • Posts: 106
Re: Show us your photography setup!
« Reply #20 on: October 28, 2011, 12:42:53 AM »
I think Scanjet 4670 does a better job than 4600. I have recently scanned about 100 posters of mine and there was not a single problem. The only noise I heard was the cable connecting to the scanning lens occasionally slightly scratch the surface of the poster. I'm not sure if it is the same noise as you experienced. To avoid the scratching, I even scanned them with the Mylar sleeves (4mm) and the result is pretty much the same. Very high quality image. I really think this is a very good solution. Unfortunately, HP stopped to produce 46xx product line. But you can always find one on ebay for less than $100 or so.
Excellent, I am so glad to find this thread. I need to do something new, the method I have now is not going to work for much longer. Right now I don’t photograph the posters, I scan them.

I evolved to this from first just trying to use my point and shoot camera which just didn’t work well. I didn’t have any lighting, the flash left glare, the fold lines stood out, the rectangle had a waste and taking pictures of posters on the floor frequently captured my toes.


I had thought the HP 4600 scanner was the answer to my problem. It seemed made for scanning large items on a flat surface then using software to stitch each image back together. It kind of worked but the HP Scanner was such poor quality that every image had stripes of alternating color hues.


I now have a flat bed scanner that I just take the lid off of and turn upside down. So the poster lies on a flat table and the scanner is placed glass side down on top of the poster. The table is marked out along the edges to position the scanner for 6 columns by 3 rows for a 30x40 quad. I then use Panavue ImageAssembler to put each individual 8x10 300 dpi image all together again.

I used to really like this method. It took a while, what with the scanning and the stitching, but you had a completely flat very high resolution image at the end of it. You didn’t have to worry about lighting, lens distortion or focus and the weight of the scanner kept the folds down. The only problem is that the scanner isn’t designed to be used upside down and it’s started making some really worrying graunchy noises recently. I thought I could just buy another of the same model and start again, but the new one I bought won’t scan upside down at all, it moves a little then sticks. Even though it’s an identical make and model I must have just been lucky it worked at all. Googling “scanners that work upside down” hasn’t revealed a solution.

I suspect I have a limited number of scans ahead of me now, that scanner is pretty old. So I am really appreciating some tips on how others do the photographic method. Harry’s setup looks great, simple items I can clear away after using them, always helps in my house…

Chengbo

Offline wormie

  • Hobbyist
  • **
  • Posts: 106
Re: Show us your photography setup!
« Reply #21 on: October 29, 2011, 05:49:44 PM »
For anyone who is interested in this approach, I uploaded a small sample of the stitched result (http://www.lostlyrix.com/wp-content/uploads/LaserJet_Pixar_Stockholder.jpg). The resolution is huge, 7225x10771. You can even see the printing pattern of the paint and you will never miss a defect of the paper by just seeing the image. I would say the effort for scanning a poster is a little bit overwhelming, as you have to physically move the scanning board about 20 times to get all the pieces for an one sheet. It is probably not feasible to scan all of your posters using such approach, but I think it is definitely worth it if you want to make some of your posters "microscoped". In addition, I think this might be a good tool for authentication.
After an exhausting week of scanning my posters, in the future I might just want to scan some of the remaining ones and use the camera for the rest. I will try to post some stitched results later when I finished.

I think Scanjet 4670 does a better job than 4600. I have recently scanned about 100 posters of mine and there was not a single problem. The only noise I heard was the cable connecting to the scanning lens occasionally slightly scratch the surface of the poster. I'm not sure if it is the same noise as you experienced. To avoid the scratching, I even scanned them with the Mylar sleeves (4mm) and the result is pretty much the same. Very high quality image. I really think this is a very good solution. Unfortunately, HP stopped to produce 46xx product line. But you can always find one on ebay for less than $100 or so.
Chengbo

Repto

  • Guest
Re: Show us your photography setup!
« Reply #22 on: November 02, 2011, 11:55:44 AM »
After an exhausting week of scanning my posters, in the future I might just want to scan some of the remaining ones and use the camera for the rest. I will try to post some stitched results later when I finished.

Thanks for the scanner recommendation, I will go take a look. I actually would prefer to keep scanning, I realize it's labor intensive but I prefer the results for the resolution and holding the folds down flat. It also avoids a lot of focus, lighting and distortion issues. It's a labor of love and I find the process quite relaxing in a zen of kind of way. Stitching all the bits gets you up close and personal with every inch of the poster too, so there is some chance of finding a signature which is always a highlight for me. I can't tell my Hinchcliff's from my Chantrells just by looking at them so I need every clue I can find.

Offline wormie

  • Hobbyist
  • **
  • Posts: 106
Re: Show us your photography setup!
« Reply #23 on: November 02, 2011, 12:02:26 PM »
It's a labor of love and I find the process quite relaxing in a zen of kind of way.
I so agree with this.

P.S. I noticed that the software you were using is not free, so I came across this free and simple one, which works perfect for me. Maybe you want to try it if you are using a PC  ;D (http://research.microsoft.com/en-us/um/redmond/groups/ivm/ice/).
Chengbo

Offline mwright

  • Hobbyist
  • **
  • Posts: 424
Re: Show us your photography setup!
« Reply #24 on: May 03, 2014, 06:37:30 PM »
Harry suggested I should do a posting here about how I made my vacuum tables and take pictures of my memorbilia, so here it goes.

The vacuum tables I built (one for posters, one for lobby cards) are constructed from regular pegboard, 1" x 1" x 8' studs, plywood, and caulk.  The pegboard's great because it already has holes.  

For the poster table, I had Loews cut the pegboard and plywood to be 48" x 38".  Two studs were cut to 48", one to 36" inches (taking into account the 1" width of the two studs it would be nailed to), and two more studs were cut to 17.5".  Those two are used on the right side to create a 1" middle gap where the vacuum hose would be placed.  I also cut five 1" x 1" x 1" stud blocks to place inside between the plywood and pegboard so the pegboard would not warp or implode from the airflow.  Everything was nailed down extensively.  The caulk was used on all sides to avoid any gaps otherwise it would not work.  The same was done for the lobby card table which is 2ft x 2ft with appropriate measurements of all materials.  A common cheap shop-vac was used for the vacuum.  I also got 2 plumbing connectors (the white thing in the photos) equal in diameter to the vacuum hose head. This is permanently connected into the 1" side gap in the tables so the vacuum hose and be connected and removed at will.  Caulk was used on this as well.

VACUUM TABLE FOR POSTERS


VACUUM TABLE FOR LOBBY CARDS


I went cheap on lighting because of cost.  I bought 2 large clamp lights and some half way decent lighting tripods.  I use 100W equivalent CFL household flourescent bulbs for the clamp lights.  Bulbs rated at 5000K "daylight" color temp give off a cleaner light for me.  My suggestion is to go better with lighting, but for my budget this did the trick.  The lights are set up equal distance on both sides of the tables.  The light on the right should be pointed towards the left side of the table and the one on the left pointed more towards the right.  This makes for a more "evenly lit" item, but again this is subpar lighting on my part.  

BASIC LIGHTING


I use a Nikon 3200 camera (24 megapixels) for nice quality and image size.  Most important is the use of a flat-field 60mm lens.  This type of lens is used to keep all geometrical aspects of the photo consistent with the original flat object, avoiding the bowed or warped effect you get with wider lenses.  The lens is a crucial part of the setup, otherwise much time is spent fixing and straightening in Photoshop.  

NIKON D3200 Camera with 60MM Nikkor Flat Field Lens


I did extensive aperture tests on the lens for sharpness.  I use the lowest ISO setting possible. The camera is set to the "locked aperture" with shutter speed automatically adjusted.  I set white balance to auto, though the suggestion would be to use a white board.  I have a decent tripod for the camera.  I use a level and grids in the camera display against the pegboard holes to be sure I'm shooting straight without tilt or pan.  This I did to the best of my ability, but there are better ways like having a great tripod.  The camera captures a 6000 x 4000 RAW low contrast image and a JPEG at the same time.  I work from the JPEG images, though more can be controlled when working with the RAW format.  I adjust the contrast/brightness using the "Preview" software that comes with Apple OSX, but this can be fine-tuned in Photoshop as well.  The results shown are about 4 times smaller and at 100dpi as opposed to the 300 dpi and large image the camera captures.  Better lighting would make for more evenly lit pictures, but for what I spent I'm super happy with the results.

Low-Contrast No Correction TRON Thai Movie Poster


Brightness/Contrast Corrected TRON Thai Movie Poster


Low-Contrast No Correction FORBIDDEN PLANET Mexican Lobby Card


Brightness/Contrast Corrected FORBIDDEN PLANET Mexican Lobby Card


I use a remote controlled power supply to quickly turn the vacuum on and off.  This allows me to photograph items quickly one after another.  I came up with a naming and numbering system.  Thai poster names start with TMP and Mexican lobby cards start with MLC.

Thai Movie Poster icons


Mexican Lobby Card icons


I print out the names on labels.  I use POLYETHYLENE sleeves and .028 thick Acid-Free Board backings from Bags Unlimited for each poster and lobby card.  Yes it's excessive, but I want it to be right.  I put the posters in their sleeves with backings and stick on the label that matches the picture name.

Backings and Sleeves


Final Poster Results


Final Lobby Results


All are stored offsite in a fairly well temperature controlled climate.  I use plastic drawers for the lobby cards and a nice blue print file cabinet for the posters.

File Cabinet


Happy Posters


Personally I think all of this is excessive, but I did it mainly to have fun.  I still need to log all the names and titles into an Excel Spreadsheet so I can search my images in different ways.  I've started work on a website and completed design templates for it, but still need to add the posters.  I'm not sure when this will be done because I am a bit tired of the whole thing and may do it later.  For now I will post here.

There are MUCH better ways to do all of the above.  I'm sure I could have made a lighter table with different materials.  My lighting could have been better and even.  I needed a better tripod.  I spent little money on the materials and am happy with the results.  This was a ton of fun.  I don't recommend doing it for anybody who isn't into it because it's a pain in the ass.  laugh1
« Last Edit: May 03, 2014, 06:46:55 PM by mwright »